How to enable BitLocker in Windows 10, with or without TPM
BitLocker used to require an Enterprise or Ultimate copy of Windows 7. These days, it is included with Windows 10 Pro, which many people get OEM with their computer. This is great news, because it means that you will be able to fully encrypt your hard drive, making it much safer in the event of loss or theft.
Full disk encryption is becoming more and more necessary with an increasing number of information workers going mobile and choosing devices like ultra-books. Furthermore, there is an increasing need for compliance with standards like HIPAA, FINRA, PCI and more, which all require encryption of sensitive datasets at rest and in transit (BitLocker encrypts “at rest” data).
Even for a typical/standard user with any amount of personal data stored on the device, I strongly recommend enabling this protection (or some other encryption software).
Enabling BitLocker with TPM
Many modern systems come with a Trusted Platform Module (TPM) chip. This is a special piece of hardware on your motherboard that stores cryptographic information, and is unique to your device. So if you have BitLocker enabled and it is able to leverage the TPM chip, that means that removing the hard disk and attempting to read it somewhere else will be fruitless–there is no way to read the data without that chip.
The other major benefit that TPM owners enjoy is that there is no need to input a BitLocker password or USB key upon boot, since the TPM chip contains the “unlock key” already. Users without a TPM chip will be required to provide a password (different than your Windows password), and this means every single time the computer boots or is restarted for any reason, you actually have to login to the machine twice. Windows won’t even begin to load until that first prompt is taken care of. Again, with a TPM in place, you will have no issues. You can reboot, and not need any sort of human interaction to complete the boot sequence.
Turning BitLocker on is pretty straightforward. The key is, your TPM has to be enabled–many devices will have this on by default (like the Surface line of products from Microsoft), but for others you might have to go into BIOS/Setup (oftentimes this means pressing F1, F11, some other “F” key or DEL as your machine first boots–to enter Setup Mode). Once you find and enable the TPM, Save & Exit your system BIOS and boot back to Windows.
Depending on your view settings in Control Panel, find BitLocker as follows:
- Control Panel > System and Security > BitLocker Drive Encryption > Turn on BitLocker OR
- Control Panel > BitLocker Drive Encryption > Turn on BitLocker
Enabling BitLocker without TPM
This process has a few extra steps, but they aren’t difficult to follow. Administrators, you can control this through Group Policy also. Users that have administrative control of their own device would do the following:
- Right-click on the Start Menu, and click Run (or Windows Key + R)
- Type gpedit.msc and press enter
- Navigate to Local Computer Policy > Computer Configuration > Administrative Templates > Windows Components > BitLocker Drive Encryption > Operating System Drives
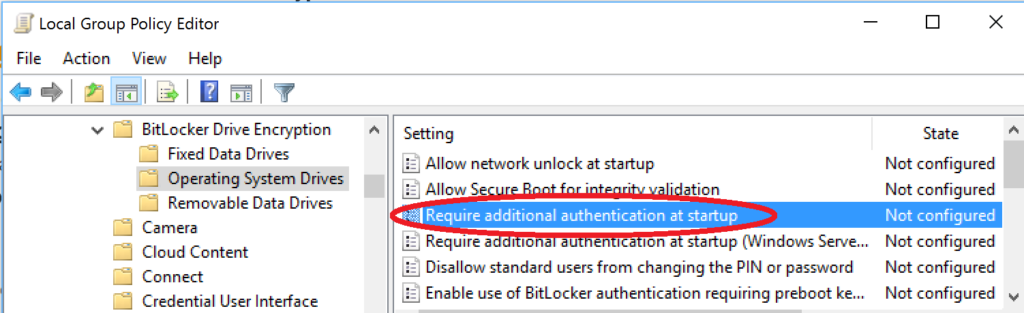
- Double-click the “Require additional authentication at startup” option in the right pane
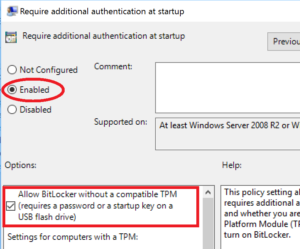
- Select “Enabled” and be sure to select the check mark box for: Allow BitLocker without a compatible TPM (requires a password or a startup key on a USB flash drive)
- Now you can go to Control Panel > BitLocker Drive Encryption > Turn on BitLocker
- You will be prompted for how you’d like to configure the unlock (via USB key or password)
- Continue through to the end of the Wizard
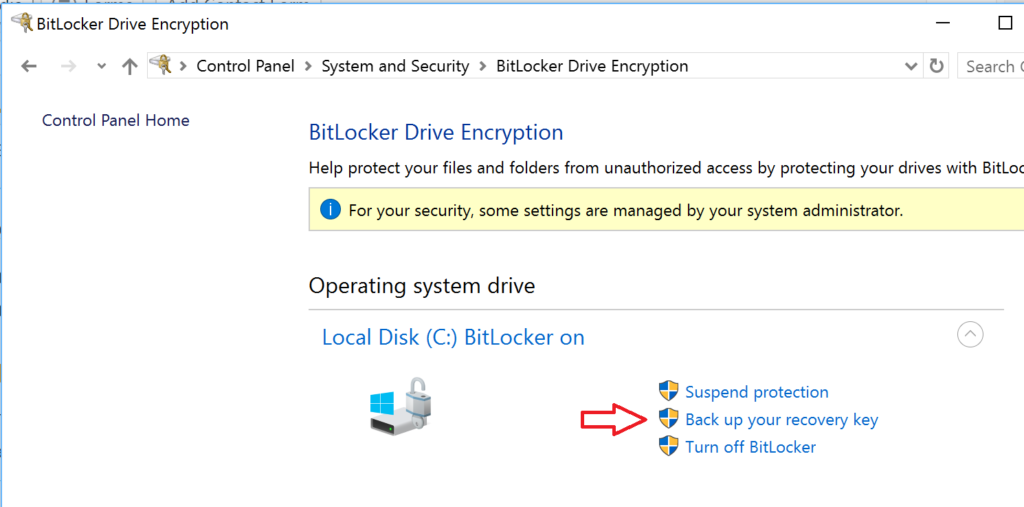
Save your recovery key
At the end of either process, you should have an option to back up the BitLocker recovery key. If you missed this step or didn’t do it, you can always return to this area in the Control Panel and click Back up your recovery key. You can save it to a file, print it, or even back it up to the cloud.
Leave a Reply